

Suburbazine
01001000 01101001 0011111
For those of you fortunate enough to have a PS24 or PS32 (or the marine versions of these), I've got something you may possibly be interested in. The catch? Requires a computer, usb cable and minimal technical skills.
First off, what this mod DOES NOT DO: Convert any 9hz sensor to 30hz (or higher). If such a means existed FLIR Government Systems corporate lawyers would have rammed a NDA down my throat and I couldn't tell you about it.
What this mod DOES DO: Adds about $3000 worth of color palettes and features (some features *ahem* rifle scope *ahem* may not work on all models).
Color tables available:
White Hot
Red Hot
Sepia Hot
Black Hot
Instalert #1
Instalert #2
Instalert #3
Instalert #4
Ironbow #2
(cannot get Rainbow or Glowbow due to memory limitations. You won't miss them )
)
What's needed:
Programming software:
RazorEOLTool (Full package including drivers needed to access imager)
Firmware:
Mod Firmware
Now, while it's extremely unlikely that you can do any irreversible actions programming these, I am not responsible for any mishaps. Should something go wrong (or totally not work) just download the latest firmware and programming tool from FLIR for your imager. The DFU system on these devices is very, very robust. Even totally borked firmware versions in my testing were easily replaced.
If you encounter an error attempting to flash the firmware using EOLtool, try to do it with the ThermoSight EU tool.
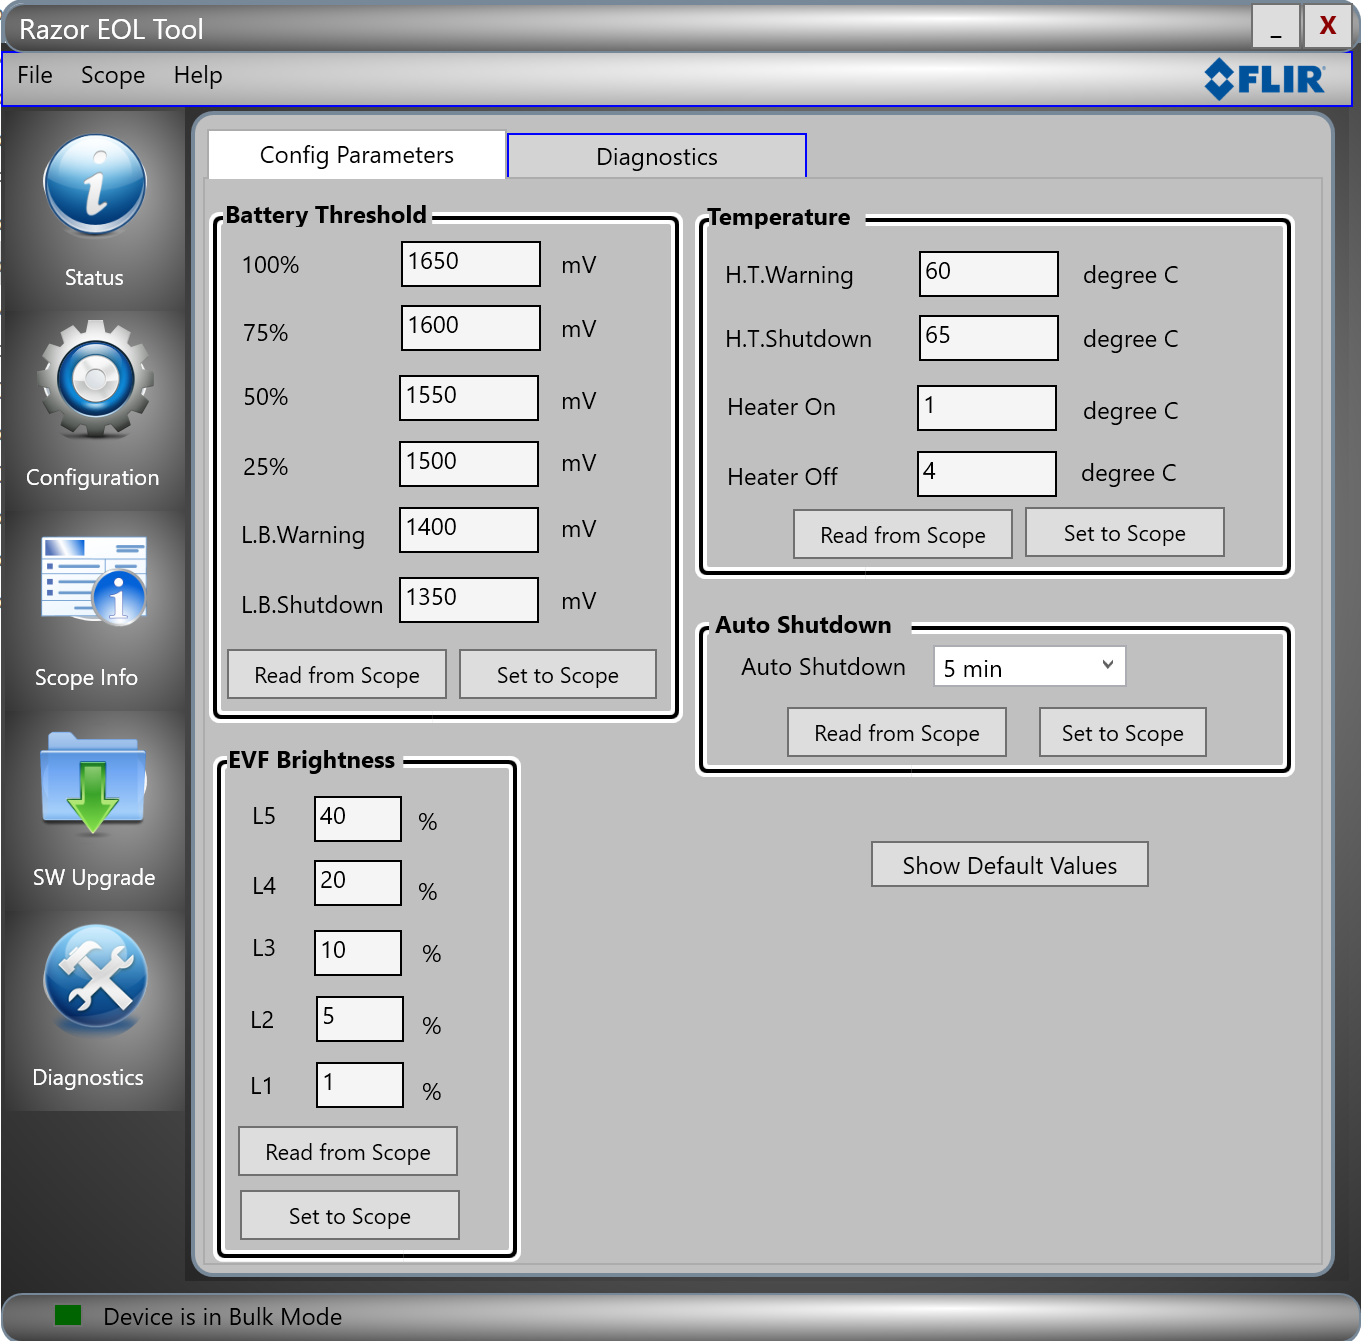
Once you have flashed the mod firmware to your imager using EOLtool, you'll need to make a couple of minor settings modifications (else your imager will think the battery is dead if unplugged and the screen may be too dark). Make your settings look like this page (and hit "Set to Scope" for each section)
Once you have this out of the way, you can explore the configuration menu and the options. Be forewarned, incorrect settings on the right hand pane can make your imager give crazy readings. Refer to >Page 28 of this document< for what those fancy abbreviations actually mean and do. You can't break your imager with anything in this section- have fun! The scope overlay settings are hit and miss- it's very dependent on the amount of onboard memory and viewer pixels available (A PS24 is not likely to work, much guessing is needed for a PS32 to show the reticles), plus it's not super reliable on saving those settings over a power cycle.
So how do you utilize these new features on your imager? Simple, hit the Palette button (this is your new menu/select button). The Brightness button is now your "Up" key, the Zoom/Freeze key is now your "Down" key. The Power button still does it's thing when held down, but now a quick press will force a flat-field-correction pass (the clicking noise). If you happen into an environment with a sudden temperature change, clicking it repeatedly will de-grain your image.
First off, what this mod DOES NOT DO: Convert any 9hz sensor to 30hz (or higher). If such a means existed FLIR Government Systems corporate lawyers would have rammed a NDA down my throat and I couldn't tell you about it.
What this mod DOES DO: Adds about $3000 worth of color palettes and features (some features *ahem* rifle scope *ahem* may not work on all models).
Color tables available:
White Hot
Red Hot
Sepia Hot
Black Hot
Instalert #1
Instalert #2
Instalert #3
Instalert #4
Ironbow #2
(cannot get Rainbow or Glowbow due to memory limitations. You won't miss them
)What's needed:
Programming software:
RazorEOLTool (Full package including drivers needed to access imager)
Firmware:
Mod Firmware
Now, while it's extremely unlikely that you can do any irreversible actions programming these, I am not responsible for any mishaps. Should something go wrong (or totally not work) just download the latest firmware and programming tool from FLIR for your imager. The DFU system on these devices is very, very robust. Even totally borked firmware versions in my testing were easily replaced.
If you encounter an error attempting to flash the firmware using EOLtool, try to do it with the ThermoSight EU tool.
Once you have flashed the mod firmware to your imager using EOLtool, you'll need to make a couple of minor settings modifications (else your imager will think the battery is dead if unplugged and the screen may be too dark). Make your settings look like this page (and hit "Set to Scope" for each section)
Once you have this out of the way, you can explore the configuration menu and the options. Be forewarned, incorrect settings on the right hand pane can make your imager give crazy readings. Refer to >Page 28 of this document< for what those fancy abbreviations actually mean and do. You can't break your imager with anything in this section- have fun! The scope overlay settings are hit and miss- it's very dependent on the amount of onboard memory and viewer pixels available (A PS24 is not likely to work, much guessing is needed for a PS32 to show the reticles), plus it's not super reliable on saving those settings over a power cycle.
So how do you utilize these new features on your imager? Simple, hit the Palette button (this is your new menu/select button). The Brightness button is now your "Up" key, the Zoom/Freeze key is now your "Down" key. The Power button still does it's thing when held down, but now a quick press will force a flat-field-correction pass (the clicking noise). If you happen into an environment with a sudden temperature change, clicking it repeatedly will de-grain your image.
Last edited: