

Verify that you have the location information filled out in your profile. This will show up under "Join Date" in your member information box (left column of any post you make). If you do not have this information add it before proceeding to the next step.
If you aren't familiar with the Marketplace Rules, or need a refresher, be sure to read them before proceeding. Otherwise your post may be deleted by a moderator.
In the forum you want to post to, click on the "Forum Tools" drop down menu located to the right of the green bar.
Choose "Post a New Thread" from the drop down menu.

Add a title for your post. If you're selling an item put "WTS" (wanting to sell). For trades put "WTT" (wanting to trade). If you're open to sale or trade you can put both. If you're looking to buy an item put "WTB" (wanting to buy). Make your title descriptive as to what you have for sale. Titles like "I want to sell this" aren't helping anyone, especially you.

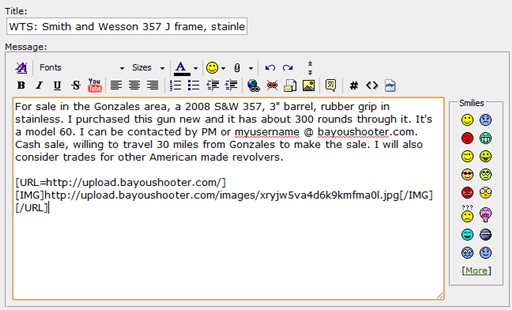
Now add your sales text to the message body. Describe your item as best you can so you don't have to keep coming back to answer "how many rounds through it" or "what model is it". If you're selling the item be sure and post a price. You can put "OBO" (or best offer) but you must have a price to start with. If you only want to trade you do not need a price. And if you have certain trades in mind list them in the post. Then you won't get a dozen offers a day for things you have no interest in. If you have certain terms for the sale it's a good idea to add those to the post. Sale transactions are generally understood to be cash only (no checks) but it's a good idea to add that. If you're willing to travel a certain distance to make the sale add that so members don't assume you are too far from them to purchase the item. Per forum rules, add another form of contact besides PM. This can be an e-mail address, phone number or mailing address. Premium members can use their bayoushooter email address which will be your username @ bayoushooter.com.
Taking several pictures also helps your item sell faster. Words tell and pictures sell so try to use a decent camera and most importantly take the photos in good light. Don't put the gun in shadow because you have your back to the light source. Digital cameras take free pictures so take a lot of pics and only upload those that are the best. Please post the images into the message and NOT as attachments to the message. It’s very irritating having to click on a half dozen attachments to see pictures of an item. It could cost you a potential sale as well. Here’s how to insert images into your message.
First, you will need to upload the images to the website. Open a new window, separate from the message you are creating, and go to the bayoushooter home page. Across the top of the screen will be the long menu bar. Click on the item that says “Image Hosting”.

You will see a page that has five buttons that say “Choose File”. If you have five or less images to post you can proceed to the next step. Otherwise press the “Add More Files” button until you have enough “Choose File” buttons for all your images. You can add up to ten images per upload which is probably as many as you would want in a thread. Note that the maximum file size for each image uploaded is 1.025 megabytes. If the images you want to upload are larger than that number you will have to resize them before uploading. You can also choose a lower resolution setting on your camera which will provide a smaller file size. You should be able to use the 3 megapixel (or lower) setting on most cameras to get a file small enough for upload.

Now click on the first “Choose File” button.
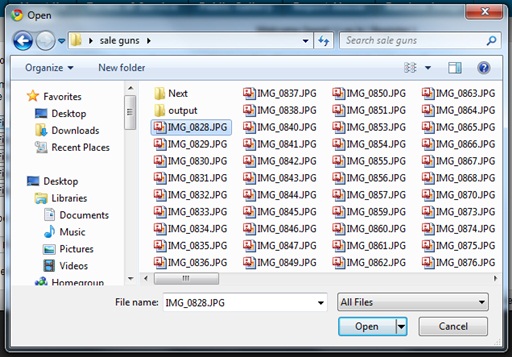
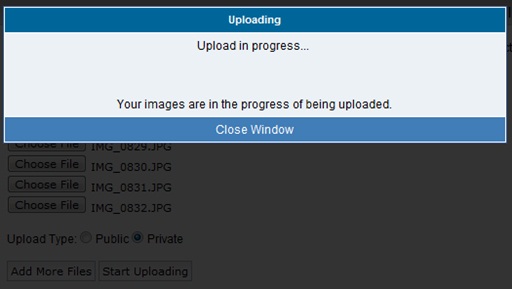
This will pop up a new window that shows you the contents on your computer. In this new window, navigate to the folder that contains the images you downloaded from your camera. Click on the first image you want to add and press the “Open” button. This will take you back to the image hosting page and you should see your file name next to the first “Choose File” button. Repeat this process for the second “Choose File” button and repeat as many times as needed until you have all of your image files chosen for upload. Do not press the same “Choose File” button for each upload or you will end up overwriting your previous choice. Use a different “Choose File” button for each image file you want to upload. After you have all of your pictures chosen press the “Start Uploading” button.

Wait as your images are uploaded to the site.
After the items have successfully uploaded you will see a screen with thumbnail pictures of all of the photos along with the code needed to make the photos show up in your message. Do NOT close this window until you are sure your message is posted correctly to the site.

Now go back to your original message window and decide where you want your images to be located in the message. Generally somewhere in the middle or end is the best place. Add a line space after your text so you can be put in your first image cleanly. Go back to the window that has your thumbnail photos and decide which image you want to have as the first one. Next to that image, on the right side, is the code you want to choose. There are several options but you want to choose the one that says “Hotlink for forums”. Highlight and copy that line of code.
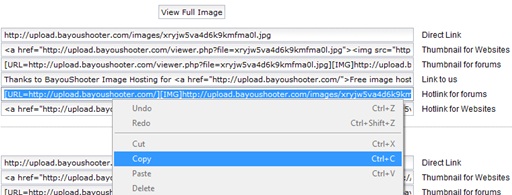
Go back to your message window and paste that line of code in the message where you want your first image to appear. The code should look something like this.
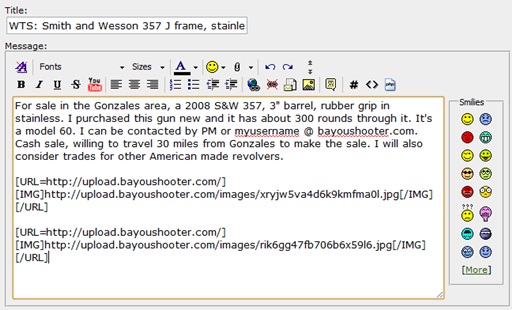
Now add another couple of lines after the first image using the “Enter” key on your keyboard. Go back to the thumbnail photo window and choose the “Hotlink for forums” code for the next image you want to appear. Copy and then paste that code into your message. Repeat this process until you have code for all of the images in your message.
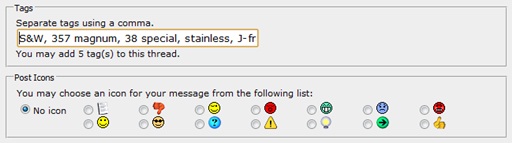
If your message is complete click on the “Preview Post” button in the message window. This will show you what your message will look like AFTER you have submitted it. If your pictures aren’t showing up you’ve done something wrong. Check your message code and click “Preview Post” again. Once you have everything looking right you’re almost there. If you close your window at this point you will lose the message so don’t do that. Scroll down the page and look over the message options. You can add up to five “Tags” to your message. These can be words that describe or are related to the item you have for sale. This will help people find your item when they search for those terms. Separate each tag with a comma. Tags can be multiple words but must be at least three characters.
If you don’t visit the site every day, and even if you do, it’s a good idea to choose a “Thread Subscription”. Choosing “Daily email notification” will send you a daily email with any new posts that were added to your thread. You will receive most of your questions and “I’ll take it” or “PM sent” messages directly on the thread which you will not want to overlook because you didn’t re-visit your thread often enough. You can also choose “Instant email notification” which will email you as soon as someone posts on your thread. This will allow you to answer questions and messages immediately rather than once a day or when you decide to visit the site again.

Once you have added all of the options you want you can click “Submit New Thread”. This will take you to the new thread you just created. If all looks right you can close the thumbnail photo window and you’re done.
Finally, after your sale is complete, be sure to return to the site and modify your title to reflect the SOLD status and then close the thread to prevent further posts on the thread.
In your original post, click Edit, then Go Advanced and edit the title from there. Please do not reply to your thread to mark it Sold.
Please DO NOT remove your post, details, price, pictures, etc.
If you aren't familiar with the Marketplace Rules, or need a refresher, be sure to read them before proceeding. Otherwise your post may be deleted by a moderator.
In the forum you want to post to, click on the "Forum Tools" drop down menu located to the right of the green bar.
Choose "Post a New Thread" from the drop down menu.
Add a title for your post. If you're selling an item put "WTS" (wanting to sell). For trades put "WTT" (wanting to trade). If you're open to sale or trade you can put both. If you're looking to buy an item put "WTB" (wanting to buy). Make your title descriptive as to what you have for sale. Titles like "I want to sell this" aren't helping anyone, especially you.
Now add your sales text to the message body. Describe your item as best you can so you don't have to keep coming back to answer "how many rounds through it" or "what model is it". If you're selling the item be sure and post a price. You can put "OBO" (or best offer) but you must have a price to start with. If you only want to trade you do not need a price. And if you have certain trades in mind list them in the post. Then you won't get a dozen offers a day for things you have no interest in. If you have certain terms for the sale it's a good idea to add those to the post. Sale transactions are generally understood to be cash only (no checks) but it's a good idea to add that. If you're willing to travel a certain distance to make the sale add that so members don't assume you are too far from them to purchase the item. Per forum rules, add another form of contact besides PM. This can be an e-mail address, phone number or mailing address. Premium members can use their bayoushooter email address which will be your username @ bayoushooter.com.
Taking several pictures also helps your item sell faster. Words tell and pictures sell so try to use a decent camera and most importantly take the photos in good light. Don't put the gun in shadow because you have your back to the light source. Digital cameras take free pictures so take a lot of pics and only upload those that are the best. Please post the images into the message and NOT as attachments to the message. It’s very irritating having to click on a half dozen attachments to see pictures of an item. It could cost you a potential sale as well. Here’s how to insert images into your message.
First, you will need to upload the images to the website. Open a new window, separate from the message you are creating, and go to the bayoushooter home page. Across the top of the screen will be the long menu bar. Click on the item that says “Image Hosting”.
You will see a page that has five buttons that say “Choose File”. If you have five or less images to post you can proceed to the next step. Otherwise press the “Add More Files” button until you have enough “Choose File” buttons for all your images. You can add up to ten images per upload which is probably as many as you would want in a thread. Note that the maximum file size for each image uploaded is 1.025 megabytes. If the images you want to upload are larger than that number you will have to resize them before uploading. You can also choose a lower resolution setting on your camera which will provide a smaller file size. You should be able to use the 3 megapixel (or lower) setting on most cameras to get a file small enough for upload.
Now click on the first “Choose File” button.
This will pop up a new window that shows you the contents on your computer. In this new window, navigate to the folder that contains the images you downloaded from your camera. Click on the first image you want to add and press the “Open” button. This will take you back to the image hosting page and you should see your file name next to the first “Choose File” button. Repeat this process for the second “Choose File” button and repeat as many times as needed until you have all of your image files chosen for upload. Do not press the same “Choose File” button for each upload or you will end up overwriting your previous choice. Use a different “Choose File” button for each image file you want to upload. After you have all of your pictures chosen press the “Start Uploading” button.
Wait as your images are uploaded to the site.
After the items have successfully uploaded you will see a screen with thumbnail pictures of all of the photos along with the code needed to make the photos show up in your message. Do NOT close this window until you are sure your message is posted correctly to the site.
Now go back to your original message window and decide where you want your images to be located in the message. Generally somewhere in the middle or end is the best place. Add a line space after your text so you can be put in your first image cleanly. Go back to the window that has your thumbnail photos and decide which image you want to have as the first one. Next to that image, on the right side, is the code you want to choose. There are several options but you want to choose the one that says “Hotlink for forums”. Highlight and copy that line of code.
Go back to your message window and paste that line of code in the message where you want your first image to appear. The code should look something like this.
Now add another couple of lines after the first image using the “Enter” key on your keyboard. Go back to the thumbnail photo window and choose the “Hotlink for forums” code for the next image you want to appear. Copy and then paste that code into your message. Repeat this process until you have code for all of the images in your message.
If your message is complete click on the “Preview Post” button in the message window. This will show you what your message will look like AFTER you have submitted it. If your pictures aren’t showing up you’ve done something wrong. Check your message code and click “Preview Post” again. Once you have everything looking right you’re almost there. If you close your window at this point you will lose the message so don’t do that. Scroll down the page and look over the message options. You can add up to five “Tags” to your message. These can be words that describe or are related to the item you have for sale. This will help people find your item when they search for those terms. Separate each tag with a comma. Tags can be multiple words but must be at least three characters.
If you don’t visit the site every day, and even if you do, it’s a good idea to choose a “Thread Subscription”. Choosing “Daily email notification” will send you a daily email with any new posts that were added to your thread. You will receive most of your questions and “I’ll take it” or “PM sent” messages directly on the thread which you will not want to overlook because you didn’t re-visit your thread often enough. You can also choose “Instant email notification” which will email you as soon as someone posts on your thread. This will allow you to answer questions and messages immediately rather than once a day or when you decide to visit the site again.
Once you have added all of the options you want you can click “Submit New Thread”. This will take you to the new thread you just created. If all looks right you can close the thumbnail photo window and you’re done.
Finally, after your sale is complete, be sure to return to the site and modify your title to reflect the SOLD status and then close the thread to prevent further posts on the thread.
In your original post, click Edit, then Go Advanced and edit the title from there. Please do not reply to your thread to mark it Sold.
Please DO NOT remove your post, details, price, pictures, etc.